Yes, Test Speaker allows you to create bookmarks for easy reference.
By using Bookmarks you can quickly move to a point in the document.
Read more about bookmarks here:
https://www.deskshare.com/help/ts/Bookmarks.aspx
Yes, Test Speaker allows you to create bookmarks for easy reference.
By using Bookmarks you can quickly move to a point in the document.
Read more about bookmarks here:
https://www.deskshare.com/help/ts/Bookmarks.aspx
Auto FTP Manager's exclude folder function will allow you to perform your transfer.
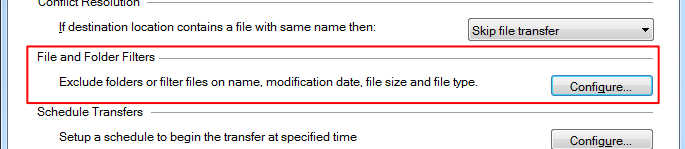
You have to create your Automated Transfer Profile, and click on the 'Configure' button for file and folder filters on the Action rules page. You will see the Configure Filters dialog.
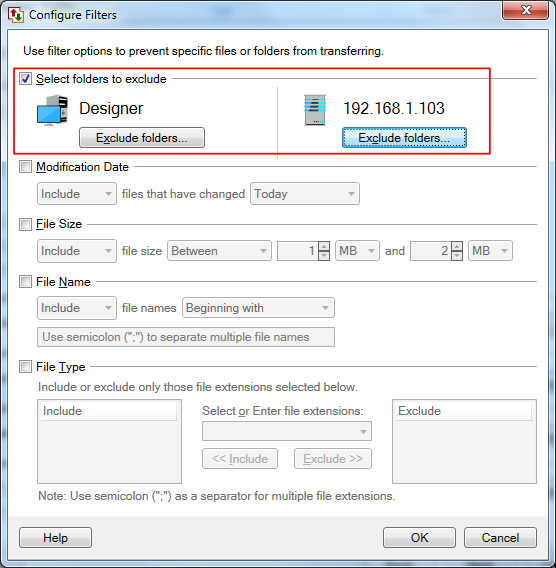
Next, click on the checkbox for 'Select folders to exclude', then click on the 'Exclude folders...' button to choose the folders. In your case you can exclude everything and keep only the three folders you want.
You can use My Screen Recorder Pro's command line parameters.
The command line parameters allow you to start, stop, and pause screen recording. With these parameters you can trigger screen recording action from other applications.
For more details on command line parameters please see this link:
https://www.deskshare.com/resources/articles/msrpro_commandlineparameters.aspx
Security Monitor Pro allows you to add same camera multiple time with different configured actions.
To add same camera multiple time, export camera configuration settings and import it as many times you want to add that camera, which will skip steps to configure the camera each time.
By configuring same camera with different actions for different scenario you can perform motion detection and regular interval monitoring at same time which helps you to keep track of motion and reason behind motion, add mask areas to monitor different regions and you can also view separate areas using zoom functionality.
Learn more about different monitoring actions.
Note: Some IP cameras might have a specified maximum connection limit. If that limit is exceeded, then the camera will not show a preview when you add it multiple times.
Yes, you can do this using WebCam Monitor. You can receive a photo taken from the webcam by email or it can be uploaded to an FTP server.
You have to select ‘At regular intervals of ’ option on the Actions tab and set the value to 60 Minutes.
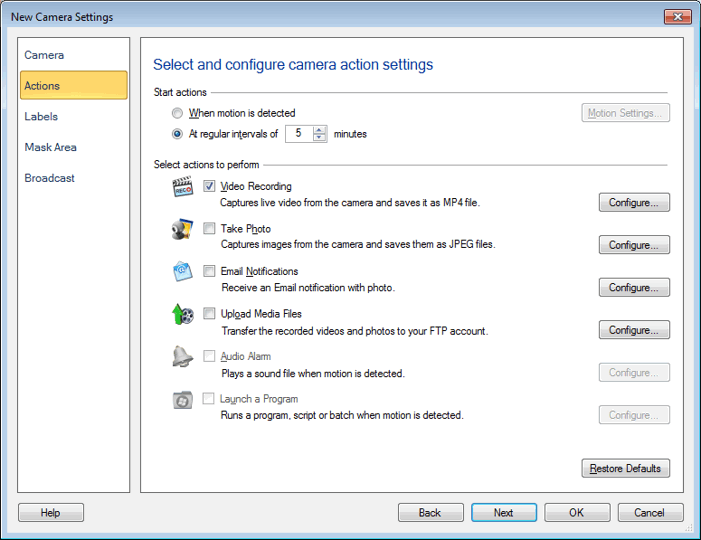
Next, select Take Photo, Email Notifications and Upload Media Files option. Once you do this, just add a schedule with monitoring action to perform during the daytime. You can add daily, weekly or monthly schedule.
There are several different French and German voices available for Text Speaker.
You can choose between the IVONA and AT&T voices for each language. Here is a list of available voices:
https://www.deskshare.com/text-to-speech-voices.aspx
Yes, Auto FTP Manager allows filtering of the files which you don’t want to transfer. You can filter out files based on Modification date, File Size, File Type and File name.
For more details on the File filter options refer this link:
https://www.deskshare.com/help/afm/Filters.aspx
I suggest using the effects in My Screen Recorder Pro to enhance your recordings.
Some options are to: add effects for the mouse pointer and mouse movements. You can also use the image overlay and time and text annotations. Using screen draw will help you make recording more effective.
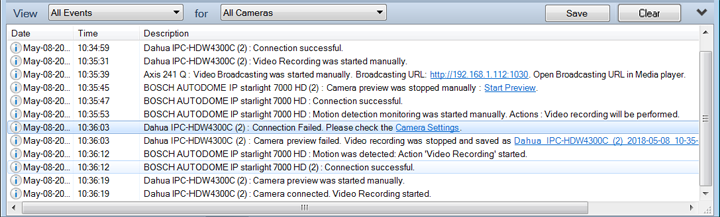
Security Monitor Pro keeps track of all important incidents in the form of event logs for each individual camera.
To view Event log for specific camera, select the respective camera from 'Show Event Log For' dropdown list in the Event log viewer. This will list all the incidents with description, date and time.
You can also create separate log file for the selected camera by clicking on the Save button, which will help you to keep record of all action events.
Using WebCam Monitor you can upload videos and photos taken from your webcam to a FTP server.
To upload photos to a FTP server, add your webcam in WebCam Monitor. Select ‘Take Photo’ and ‘Upload Media Files’ options on the Actions tab. To upload files to a FTP server, you need to create FTP account profile and enter details like FTP address, username, password and port.
After creating the FTP profile you will see a ‘FTP Upload Settings’ dialog. Choose ‘Upload photos to my website’option from the drop down under ‘Upload Options’ section.
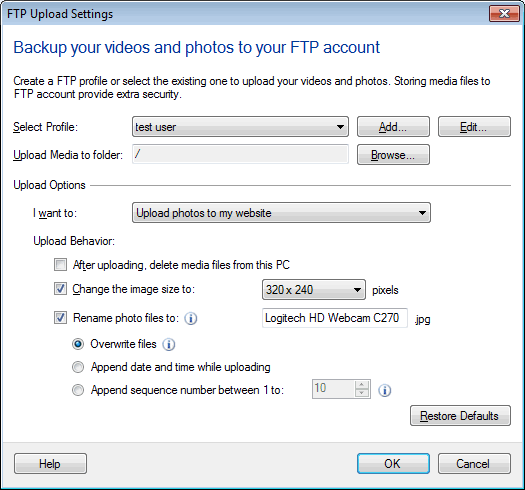
Finally, choose ‘Append date and time while uploading’ option. This will maintain all your images at the FTP location and will add the date-time to the file name.
You can adjust the voice pitch, speed and volume in Text Speaker.
Do these adjustments from ‘Voice Options’ dialog.
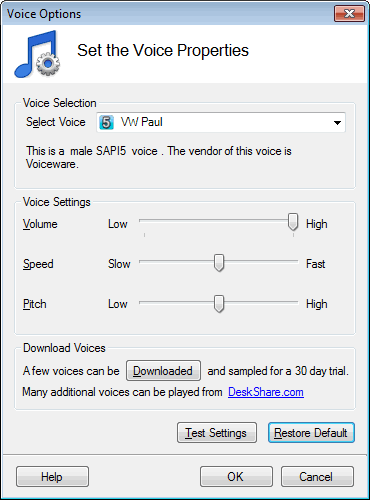
Before applying the changes click on the ‘Test Settings’ button to listen to the voice. By using ‘Restore Defaults’ button you can revert the changes you made.
Yes, Auto FTP Manager can skip the file transfer if the destination already contains a file with same name. To configure this, select the 'Skip file transfer' option in the Conflict resolution drop down list. This will download only new files. Next, you can use the 'Configure' button to add a schedule to automate the process.
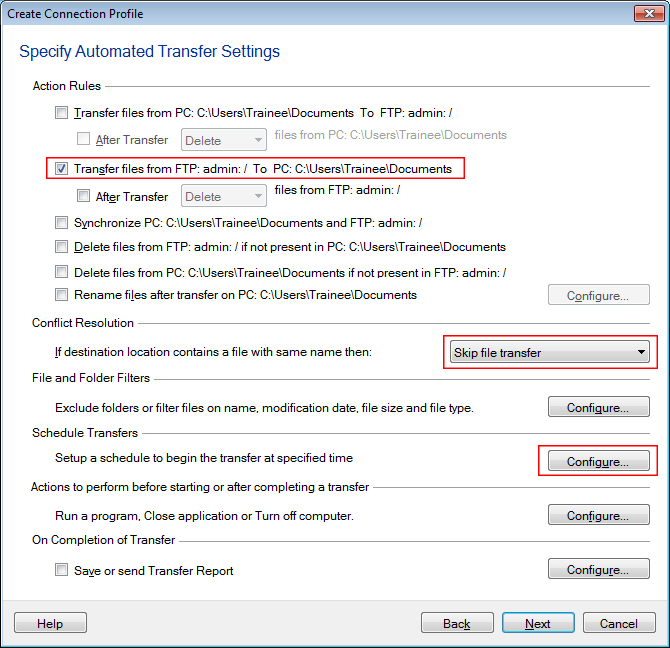
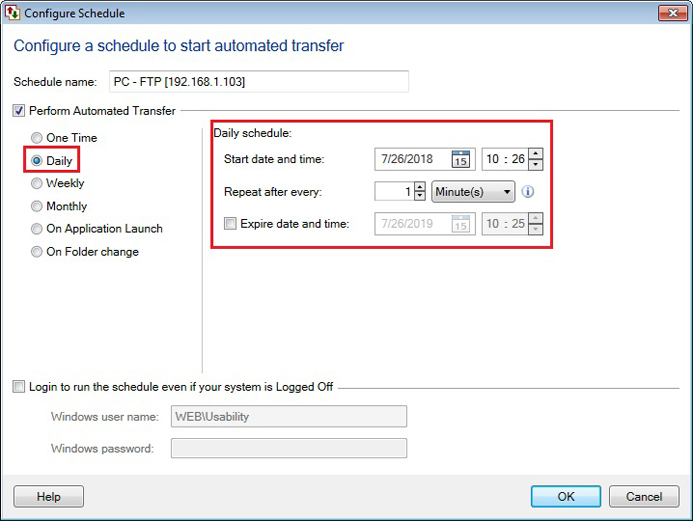
Choose a daily schedule type, enter the start date-time and set the repeat interval to 2 minutes.
The schedule will run every two minutes and only new files will be downloaded.
My Screen Recorder Pro can start another program before beginning screen recording.
You can do this through the Scheduler. While adding a schedule, click on the ‘New’ button under ‘Optional actions to be performed at the start of recording’ section. Select ‘Start a program’ option from the Action drop down.
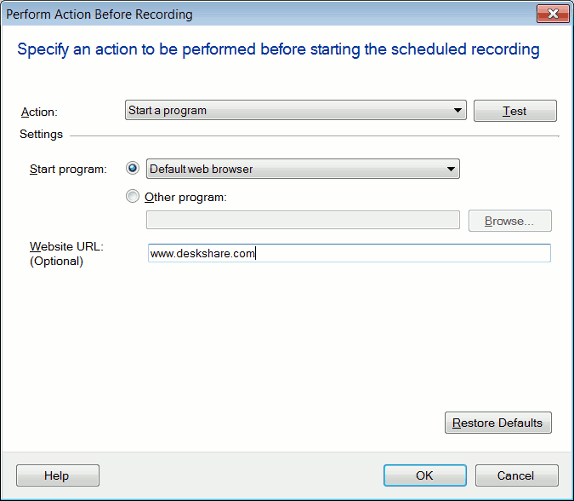
Select the ‘Other program:’ option and browse for your program to run before starting the screen recording. Click OK and then Finish. When the schedule runs, the program you have selected will be launched and then screen recording will start.
Security Monitor Pro has a default option to restart previously running actions on application launch.
To stop previously running actions, click Settings icon from the tool bar and uncheck "Restart previously running actions on application launch" option. You can also stop the actions manually before closing the application.
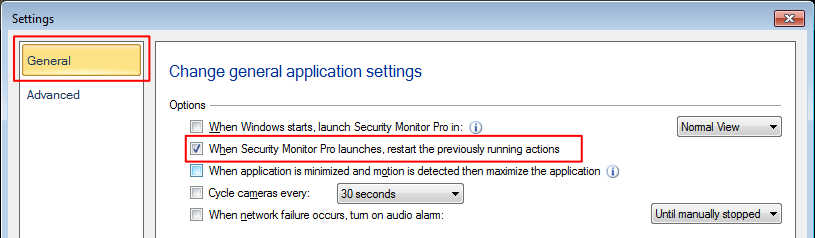
This option will prevent the previous running actions to restart on application launch.
You can change the brightness for your webcam from WebCam Monitor. While adding your webcam, click on ‘Camera properties’ link on add camera dialog and adjust the brightness level.
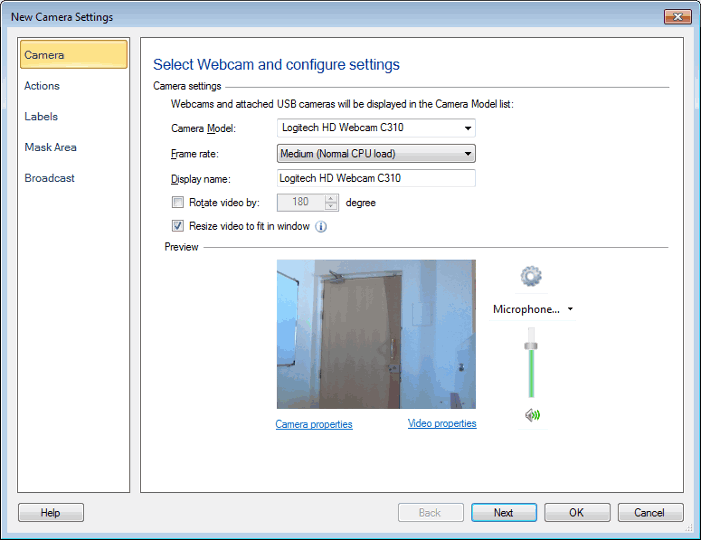
You can also access ‘Camera properties’ by right clicking on the camera preview or from the ‘Camera’ menu.
Note that the dialog shown after clicking on ‘Camera properties’ link is specific to your particular webcam. It will be different for other webcams, but you can adjust the camera brightness from that dialog box.
In Text Speaker you can add a bookmark to mark the point to begin reading.
To add a bookmark, select the text, click on the ‘Edit’ menu and choose the ‘Add Bookmark’ option. Save the change to the file.
The next time when you open the file in Text Speaker, go to the ‘Edit’ menu and select the ‘Go To Bookmark’ option. Choose the bookmark you added. Now, click on the ‘Speak’ menu and select ‘Speak from Current Cursor Position’ option.
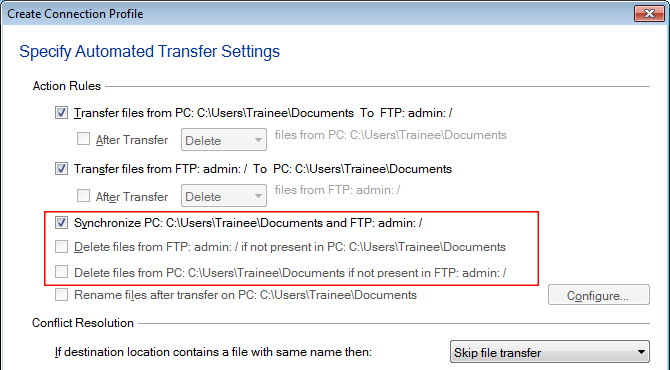
You can automatically synchronize folders on two locations using Auto FTP Manager.
While creating the automated transfer profile, select the check box for synchronizing source and destination as shown here:
In the next step, add a weekly schedule by selecting only Monday and Thursday. Specify the Start Date and Start time to run the schedule.
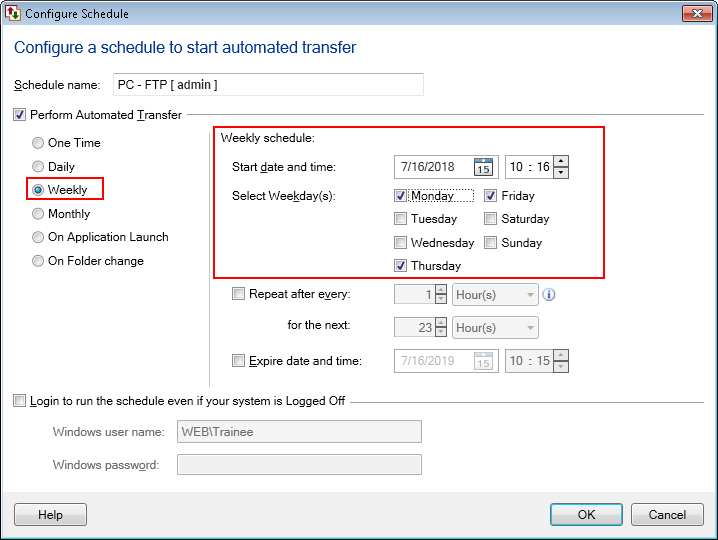
If you want to know more about creating scheduled profiles see this link:
https://www.deskshare.com/help/afm/ScheduledProfiles.aspx
You can add a title to WMV format screen recordings in My Screen Recorder Pro.
Go to 'Settings' and select the ‘Recording Format’ tab. Select the WMV video format. Click on the ‘Metadata…’ button and you will see the following window:
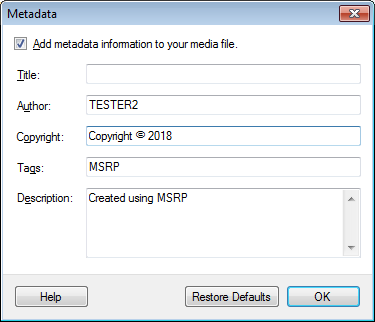
Add the title in the respective field. When you playback the file in Windows Media Player the title will be shown.
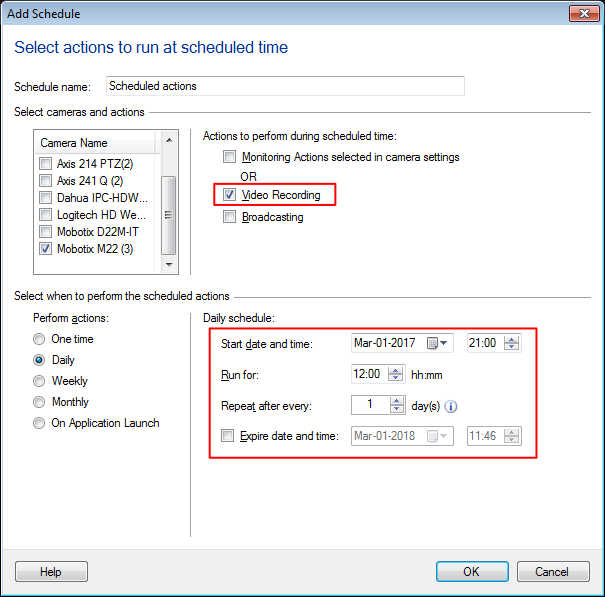
The way to accomplish this in Security Monitor Pro is by adding two schedules.
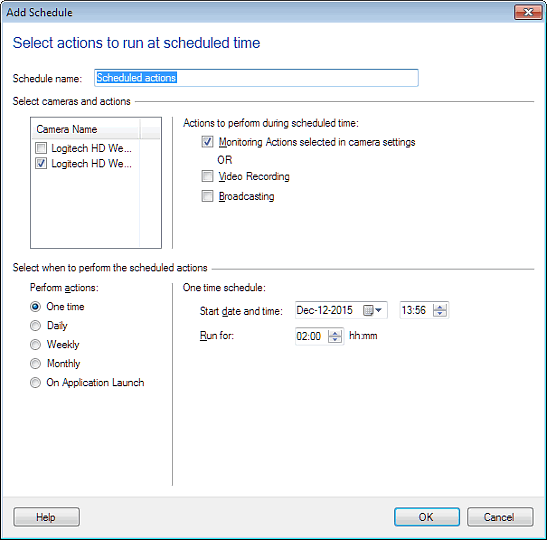
For the first schedule, select the ‘Monitoring Actions selected in camera settings’ option on the ‘Add Schedule’ dialog.
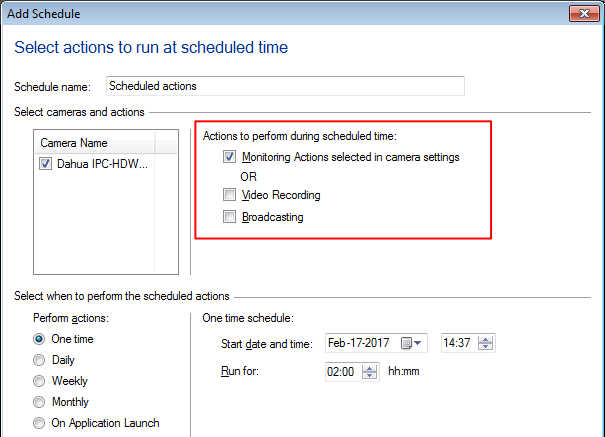
Make sure you have selected the ‘Take Photos’ action from the actions tab on the Add/Edit camera window. The video recording action is selected by default, uncheck it.
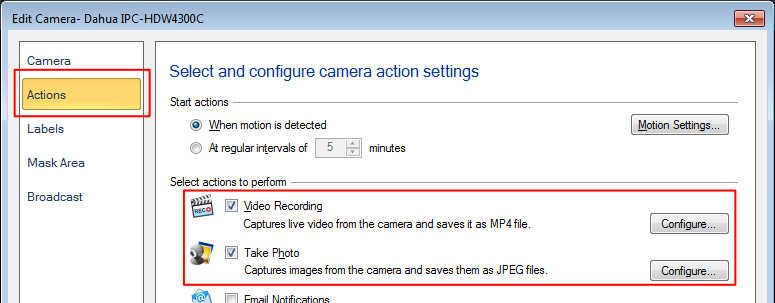
For the second schedule, select the ‘Video Recording’ action from the ‘Add Schedule’ dialog. While adding the schedule, enter the start date and time, and the number of hours to run the schedule.
Yes, you can set different date formats on each webcam in WebCam Monitor.
Go to the Edit camera dialog and select the ‘Labels’ tab. Click on ‘Configure’ button, you will see the following window:
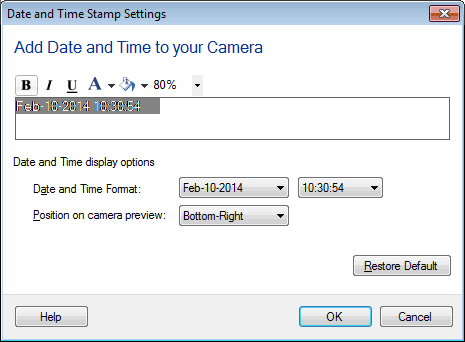
Choose a different date format from the drop down. Repeat the same procedure for other webcam.